Sitar Tuning and Maintenance

When starting sitar, people have lots of questions about the instrument, about tuning, and especially about Indian words relating to music.

Here is a primer on all of these things and a little more. Please note that this document is meant to be used as a reference guide, not a substitute for instruction.

While the definitions included here are exact, the results may not be. Please don’t expect to be 100% in tune, for example, after following this guide, as other factors like ambient humidity, your ear and skill level, the raga being played, etc., all affect sitar tuning.


Wearing a Mizrab:

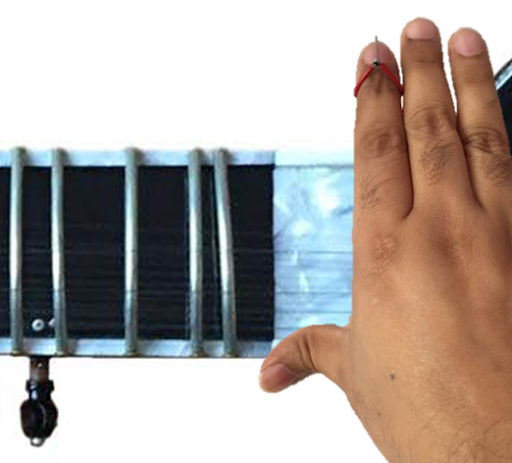
A mizrab is a steel plectrum worn on the index finger of the right hand. This is our “pick” with which we pluck sitar strings. Please Note that when you first start wearing a mizrab, it will hurt, and your finger will start to form calluses near the first knuckle.

The mizrab should be neither too loose (it shouldn’t shake or change position when you use

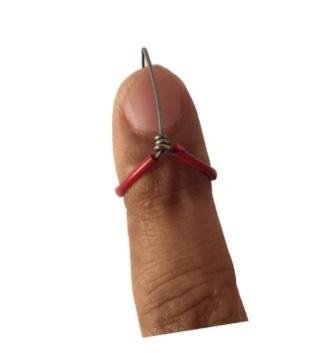
Correct position of the mizrab on the index finger

it to strike a string), nor too tight (your finger should not turn purple or be painful when wearing a mizrab). Use common sense when playing and try to find a mizrab that is right for you.

No mizrab is “one size fits all.”


The Strokes of the Sitar:

There are two main right hand strokes used to play the sitar. Rest your right thumb on the neck, with your thumb at the joint between the neck and the gourd. Your fingers should be relaxed and pointed downwards.

The first stroke is called “Da” and is made by closing your fingers towards your hand and striking the main playing string (but do not completely close your fingers into a fist).

Opening your fingers and striking the string on the way down is the “Ra” stroke. Again, fingers come in = Da. Fingers open outwards = Ra.

Da: Fingers coming inward to hit string

Ra: Fingers opening outward to hit string


The Strings of the Sitar:

Here is an image of how you would see a sitar looking down at it, with the upper layer of strings numbered from top (1st string) to bottom (6th string). Note that you will spend 95-99% of your time playing the top, or main string.

This 1st string is also called “Baaj ki taar” in Hindi & Urdu. The word “Baaj” means “Sounding or Speaking,” which explains the name of the string played most often. Baaj ki taar literally translates to “string of playing”. The second string is the thickest string (and the only bronze string) on the sitar, and is called the “Joda ki taar”.

The next two strings are named for the notes to which they are tuned, and the last two (5 and 6) are named “chikari” strings.

String Number Indian Tuning (String Name) Western Tuning (Octave Identification)
1 (Top String)
Ma (Baaj ki taar)
G
2
Sa (Joda)
D (an octave lower than 1st string)
3
Ga (Gandhar)
F# (F-sharp)
4
Pa (Pancham)
A
5
Sa (Chikari 1)
D (an octave higher than 1st string)
6
Sa (Chikari 2)
D (two octave higher than 1st string)

Frets and Their Notes:

Frets are the metal bands that separate notes along the body of a sitar. Note that although a fret is technically a metal band across the body, we refer to the area just to the left of a fret when we’re talking about a particular note. This may sound confusing, but it will become clear when you look at the diagram below.

Each note name indicates where a string must be held to produce the sound indicated. For example, the fret to the right of the biggest gap on the body is the “Re” note. Just to the left of this is the “Sa” note. Note that a fret is called a “parda” in Hindi and Urdu.

The Notes of an Octave
Indian Names
Their Western Counterparts
Sa
Shadj or Shadaj
D (The Tonic)
Re
Rishabh
E
Ga
Gandhar
F# (F-sharp)
Ma
Madhyam
G
Pa
Pancham
A
Dha
Dhaivat
B
Ni
Nishad
C# (C-sharp)

Here’s how this looks on a sitar (The big gourd should be on your right side). The first three notes are underlined, indicating the lower octave, called the “Mandra saptak.”

The next seven notes indicate the “Madhya saptak” (the medium or regular octave). Finally, the last “sa” shown below indicates the beginning of the “Tar saptak” or higher octave.


Tarab Notes:

The strings on the bottom layer of a sitar are called “Tarab” notes. This word derives from Arabic and does not have an exact translation, but indicates a mood of emotional transcendence. Very likely this name came about for sitar because of the way tarab strings are tuned to enhance the ambience of the raga being played.

Shown below are tunings for these tarab strings. This is standard tuning, and corresponds to the Major (also called Ionian) scale in western music. In Indian classical, this is Raga Alhaiya Bilawal. Tarab tuning is changed according to the raga being played but this is the place to start.

Tarab String Number
Note Name
Western Tuning
1
Ni
C# (An octave higher than Baaj ki taar)
2
Dha
B (An octave higher than Baaj ki taar)
3
Sa
D (An octave higher than Baaj ki taar)
4
Re
E (An octave higher than Baaj ki taar)
5
Ga
F# (An octave higher than Baaj ki taar)
6
Ma
G (An octave higher than Baaj ki taar)
7
Pa
A (An octave higher than Baaj ki taar)
8
Dha
B (An octave higher than Baaj ki taar)
9
Ni
C# (An octave higher than Baaj ki taar)
10
Sa
D (Two octaves higher than Baaj ki taar)
11
Re
E (Two octaves higher than Baaj ki taar)

Tips for the Tuning process:

Use the Cleartune app if available! It makes things a lot easier. If you don’t have access to the app, any electric tuner will do just as well.

  1. Tune your Joda (the bronze string) to Sa by playing just that one string. Within ClearTune, using default settings, you are trying to match the image below. You may end up being just slightly off (with the red needle slightly to the left of the “0”) but that’s ok. Just try to get the green downward pointing triangle on the D as shown. Wait for the needle to settle on the right note before moving on to the next string.

Here are a couple of examples.

String #2: Joda ki Taar (Bronze String

String #3: Gandhar (F#)

2. Now continue tuning your Gandhar, Pancham, and chikari strings to their respective notes using the tables shown previously, with ClearTune as a guide (remember, you’re trying to get the green triangle to point to the right note as you play a note on your sitar).

As shown above, Gandhar can be tough to tune as it falls on a non-traditional note on the Western scale. You’re trying to get it to roughly between E and F in Cleartune.

3. Now tune your main playing string (the 1st string on the top layer) to Ma (G using ClearTune).

4. Next, tune your tarab strings, again using the table shown as a guide. Remember to match octaves so your sound is not too high or too low!